Introduction
Who is this article for?
This article is for IT administrators who manage identity and access for their organization and need to configure Single Sign-On (SSO) between Microsoft Entra ID (formerly Azure Active Directory) and Avontus Quantify. You will need access to your organization's Azure portal and Quantify's Global Options. If you are setting up SSO for an external organization whose users need access to your Quantify system, share this article with their IT team — they will need to complete the same steps on their end.
SSO
There are two ways to log in to Quantify. Quantify supports two authentication methods, and both work side by side:
Standard username/password - always available, encrypted, and works for any user regardless of SSO configuration.
SSO via Microsoft Entra ID (formerly Azure Active Directory) - available for users whose username is an email address on a domain configured in Quantify's Global Options.
Quantify determines which method to use automatically, at login, depending on whether a user enters an email or username.
When a user enters their username, Quantify checks whether it is an email address and whether that email domain matches one of the configured SSO domains. If both are true, Quantify routes authentication through Entra ID and hides the password field on the sign-in dialog box.
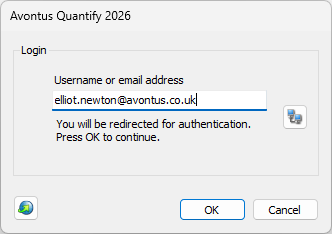
If the username is not an email address, or the domain isn't configured for SSO, Quantify uses standard username/password authentication.
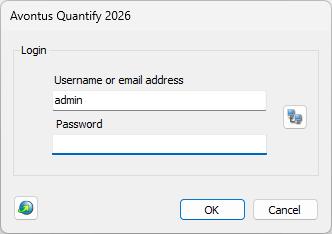
If you want to enforce SSO for your entire organization with no password fallback, every user's username in Quantify needs to be an email address on a domain you've configured in Global Options.
Please see Registering a Domain and Return URLs for information.
Any user whose username is not an email address, or whose email domain isn't configured, will continue to authenticate with a password.
Prerequisites
Before you begin, confirm the following:
You have an active Microsoft Azure account with permission to create App Registrations.
You have administrator access to Quantify Global Options.
Each user you want to authenticate via SSO must have a username in Quantify that matches their email address in Entra ID exactly.
An active internet connection is required for SSO — Entra ID authentication is internet-based.
Step 1: Create an App Registration in Azure
Sign in to the Azure Portal (https://portal.azure.com)
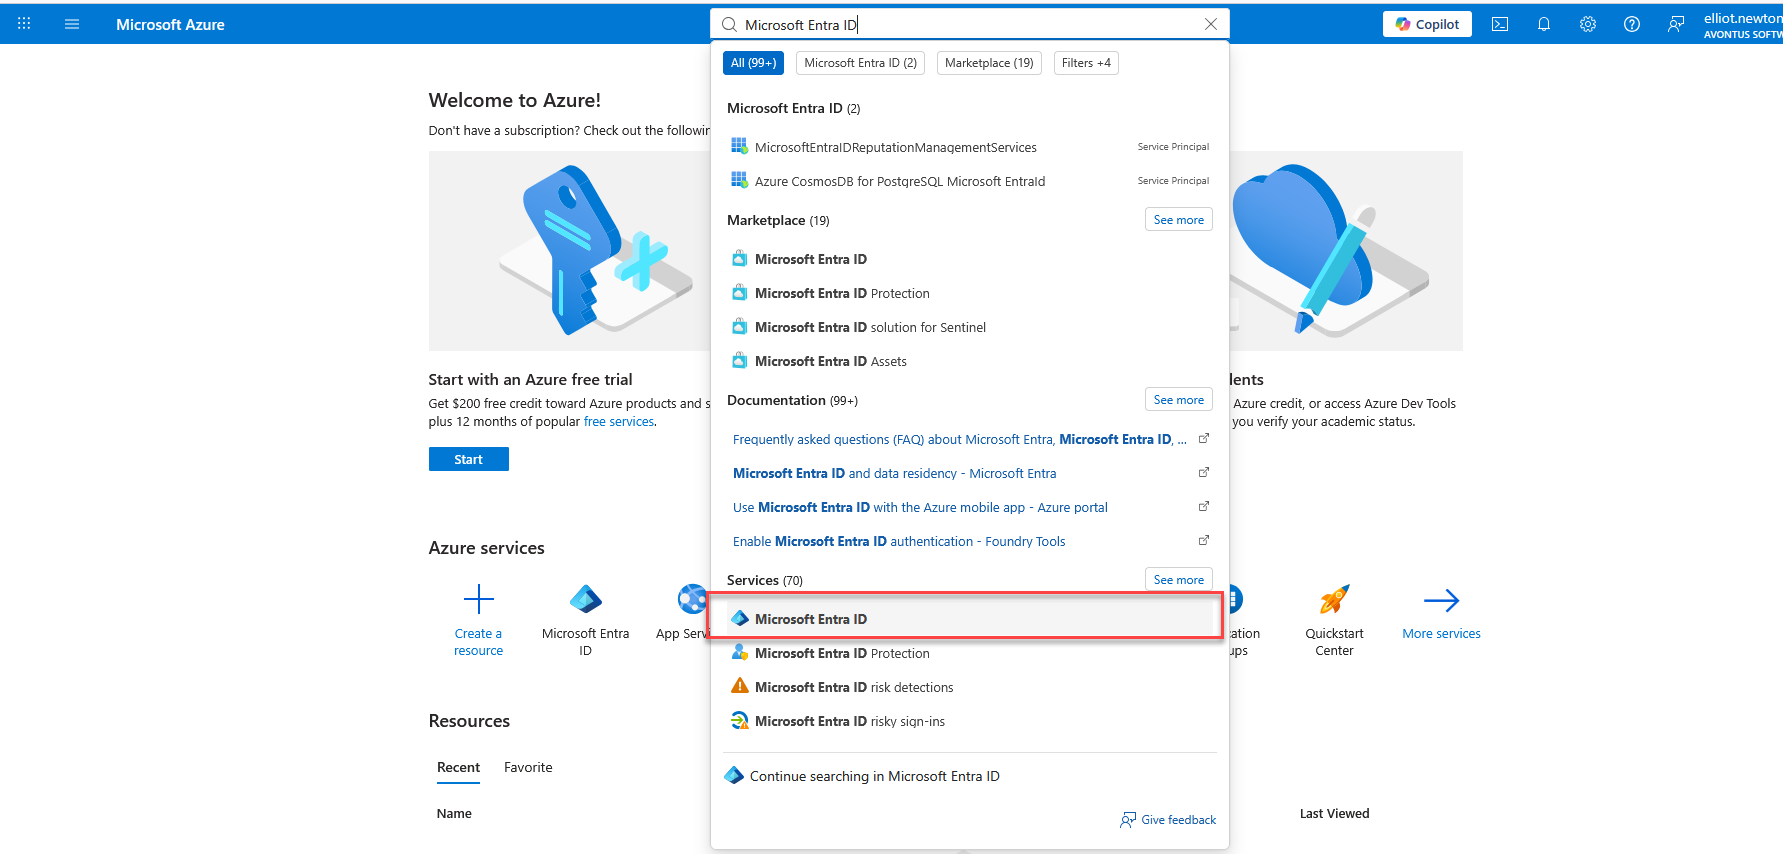
Search for “Microsoft Entra ID”, and select it
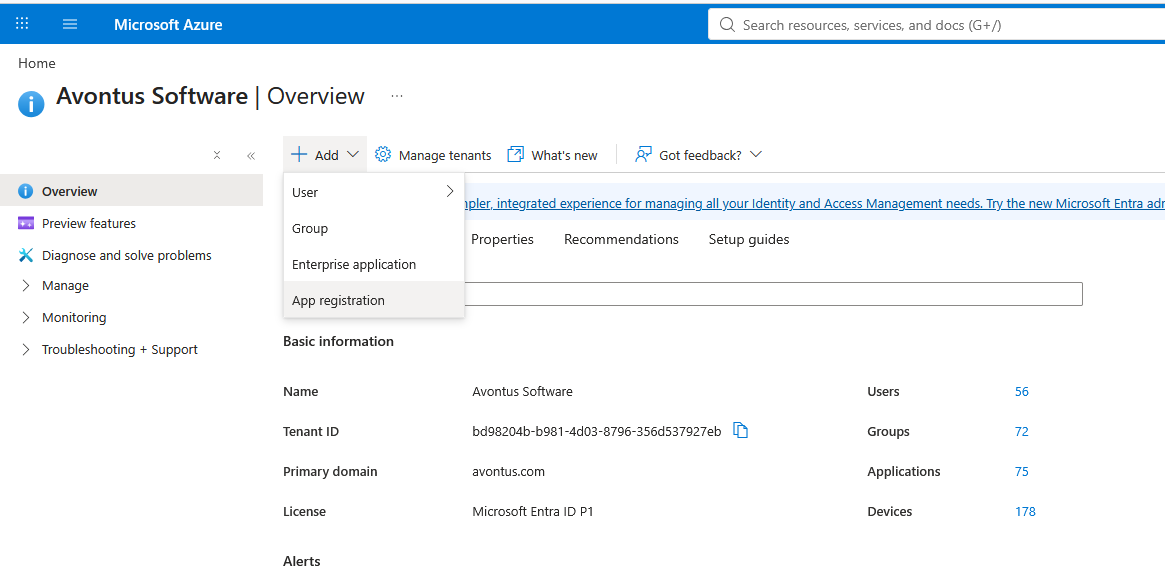
Select Add
Click Add Registration
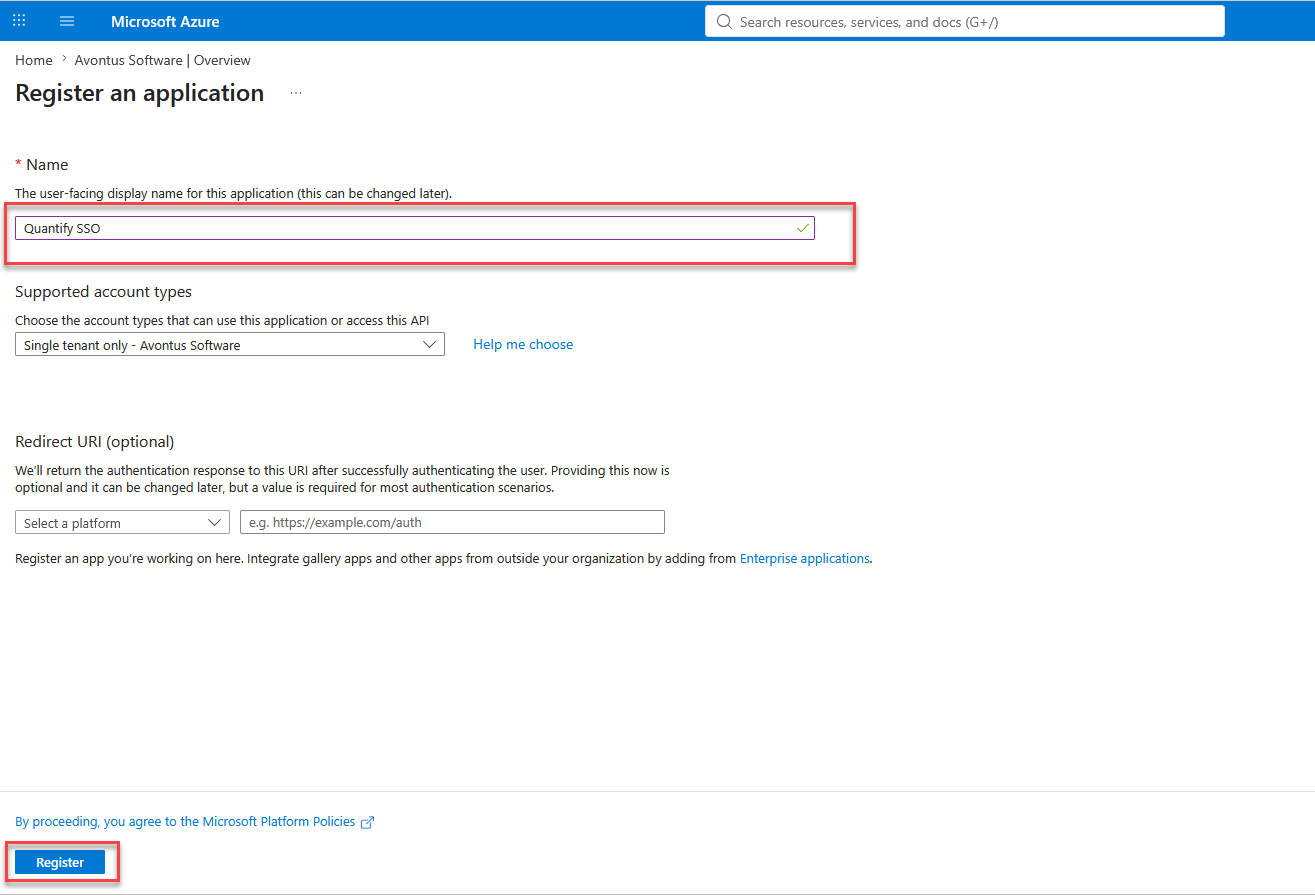
Enter a name for the registration (for example Quantify SSO)
Click Register
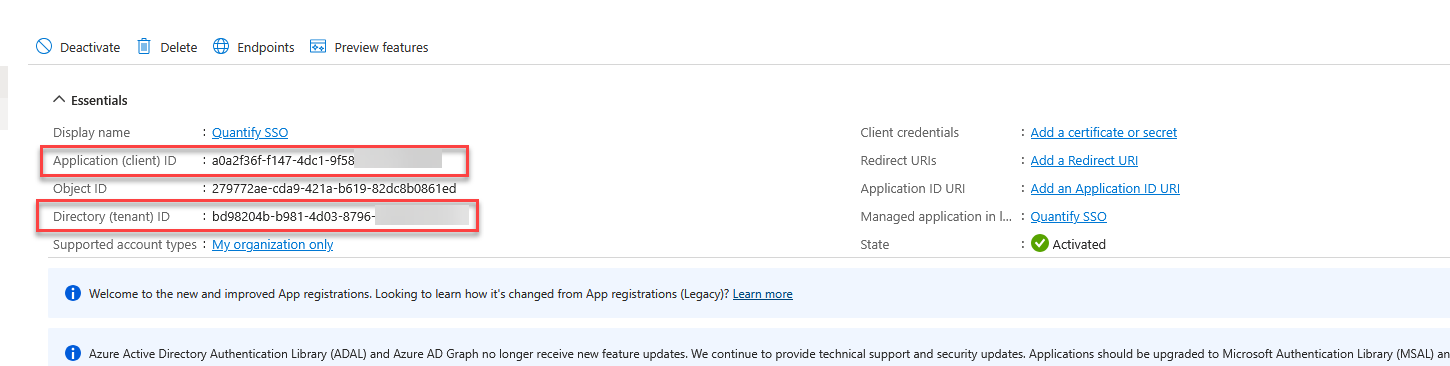
On the App registration page, note the following values (you will need this when you configure the domain in step three).
Application (Client) ID
Directory (tenant) ID
Step 2: Add redirect URIS
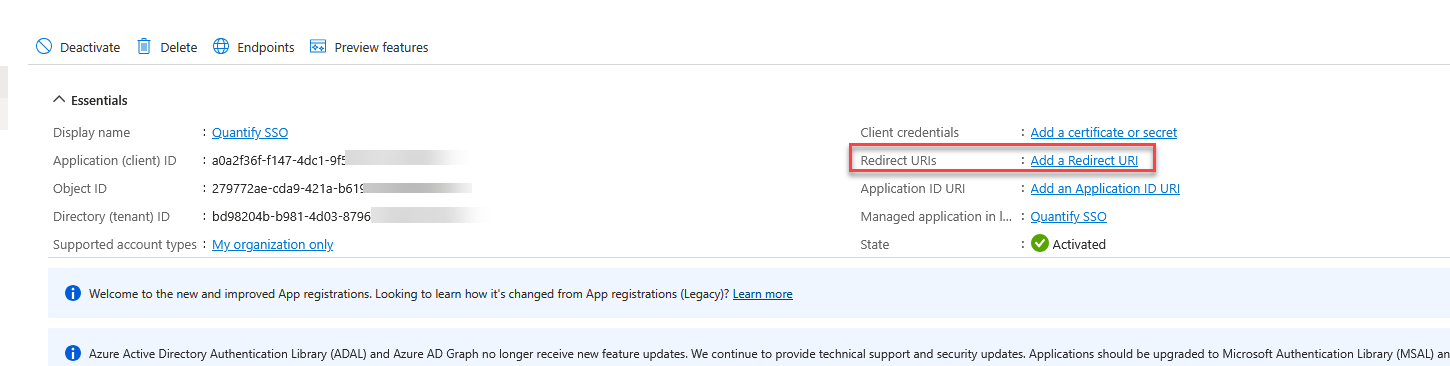
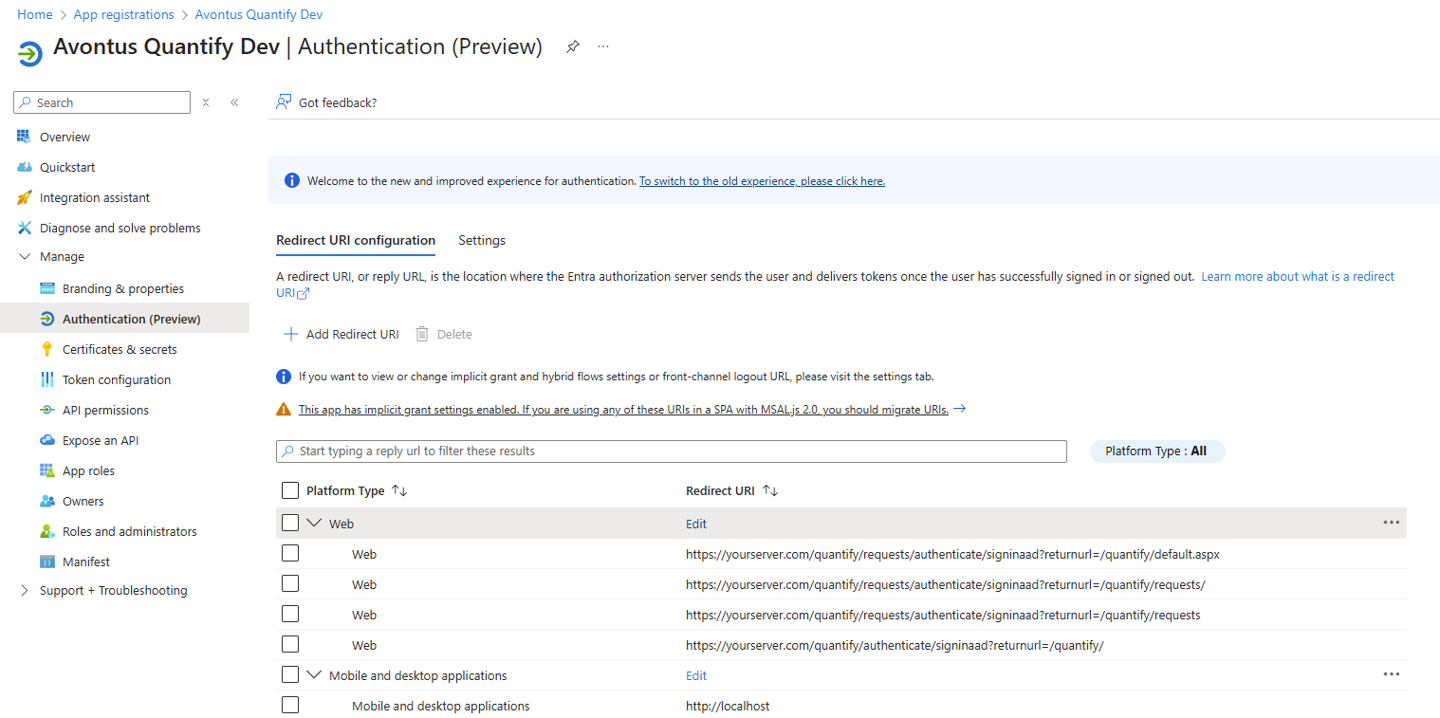
In your App registration, select Add a Redirect URI
Click Add Redirect URI
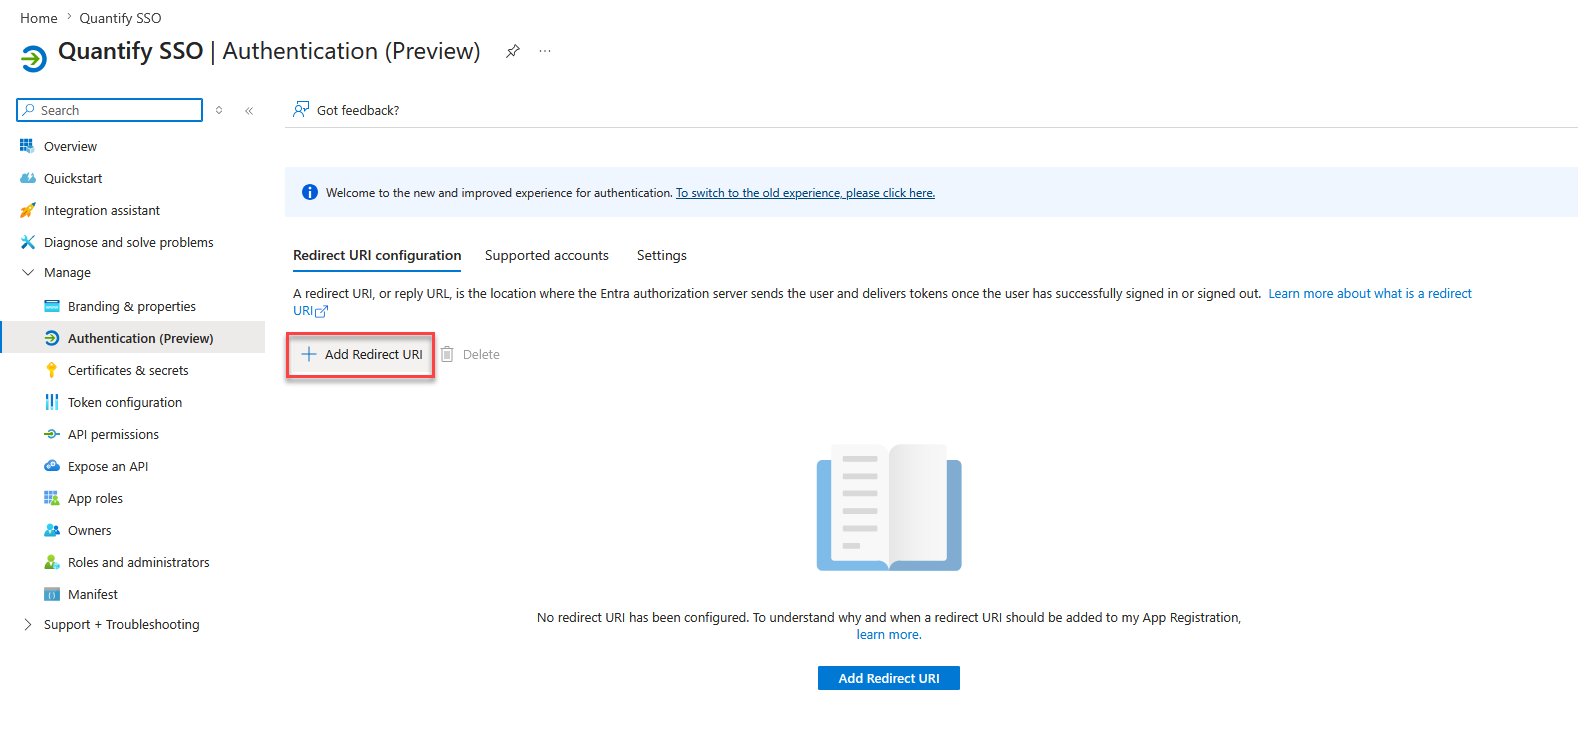
3. Select a platform to add the direct URI.
For Quantity desktop, select Mobile and Desktop applications.
For Quantity Web, select Web.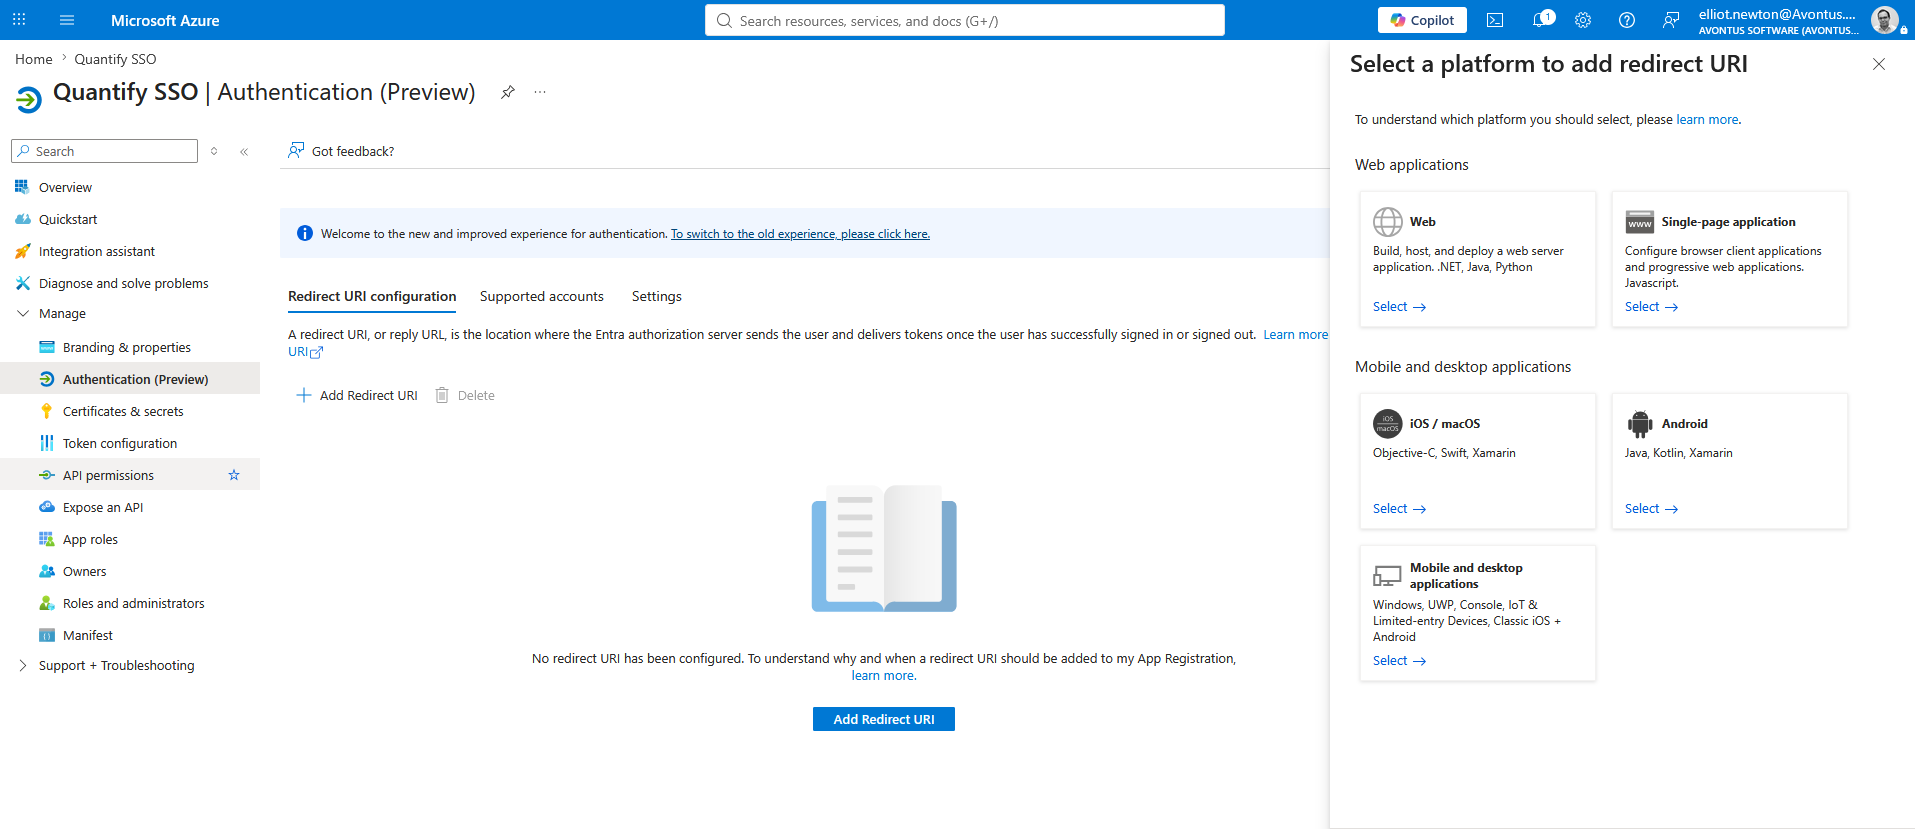
4. Add the URI for your deployment, and click Configure
Quantify Desktop requires: http://localhost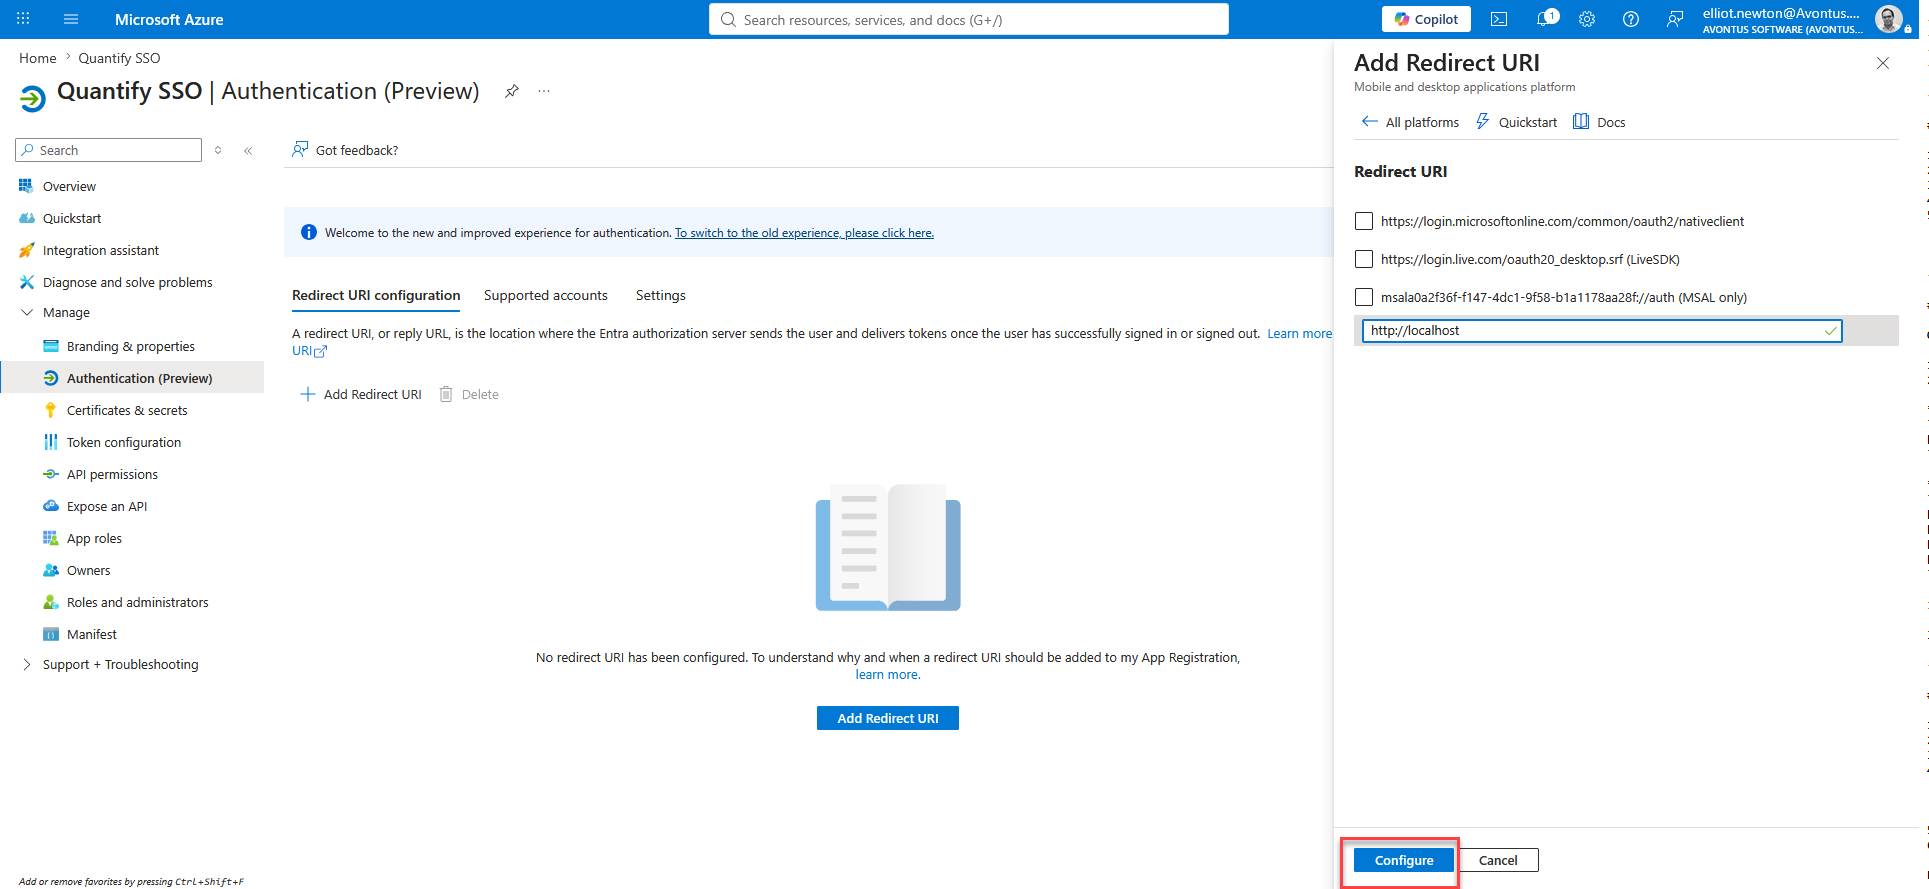
Quantify Web requires four URIs. Replace yourserver.com/quantify with your actual Quantify Web URL:```
https://yourserver.com/quantify
https://yourserver.com/quantify/signin-oidc
https://yourserver.com/quantify/Account/Login?returnUrl=/quantify
https://yourserver.com/quantify/request/Account/Login?returnUrl=/quantify/request
```
Note: The ?returnUrl= path must match the subdirectory of your server. If Quantify Web is hosted at https://yourserver.com/quantify , use ?returnUrl=/quantify . If it is hosted at https://yourserver.com, use ?returnUrl=/ instead.
Step 3: Configure the domain in Quantify Global Options
To Register a Domain Name:
Select Tools
Select Global Options
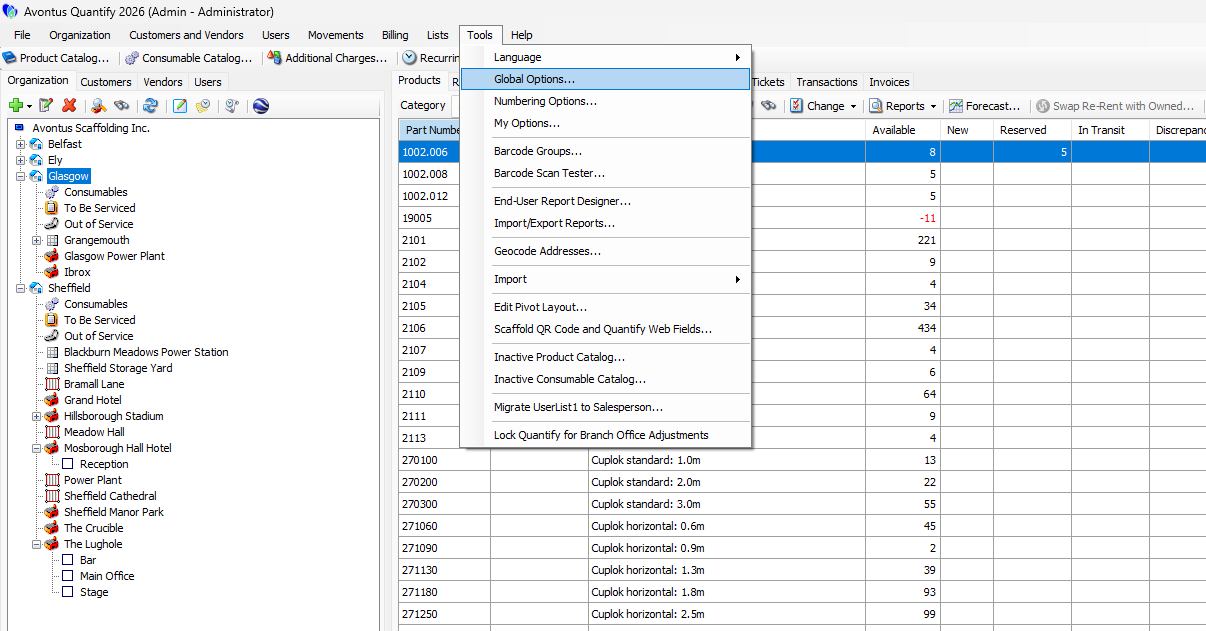
In the General tab, select the green + icon
.png "image(60).png")
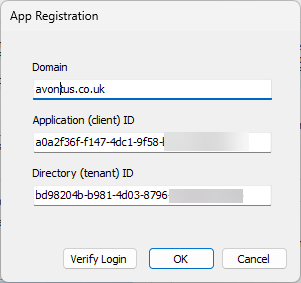
This will display the Domain App Registration dialog
.png "image(61).png")
Provide the details of the Domain Name. These can be found when you created an Entra ID login on the Azure portal.
Click Verify Login
Note: Click OK to save the domain without verifying the login.
Pick an Account from those available
.png "image(76).png")
Enter the Password, and click Sign in.
.png "image(63).png")
Provide the Enter code sent to your authenticator app.
.png "image(78).png")
Your login will be verified.
You can find your domain in the Global Options..png "image(88).png")
Return URLs
Active Directory logins utilise OAuth which requires an HTTP listener to be present at the client side in order for the server to communicate with it. For security reasons, the specific listener URLs must be present in the list of registered redirect URIs in the Azure Portal.
Edit the App Registration you wish to configure
Click Authentication.
Add the 5 Urls below. The desktop app just requires http://localhost, but Quantify Web requires four URLs, for the different component parts of Quantify Web including the request portal. Add these as listed, replacing yourserver.com/quantify with your specific web URL.
Note The ?returnUrl= part of the path needs to match the subdirectory of your server too. So if your Quantify Web server is hosted at https://yourserver.com/quantify, ?returnUrl=/quantify is valid. However if you hosted Quantify web under https://yourserver.com, ?returnUrl=/ would be valid.
Step 4: Ensure users exist in both systems
For SSO to work, each user must exist in both Entra ID and Quantify, with the same email address as their username. If a user's email address is not registered in Quantify, the login will return the error: "This username does not exist or is not active."
Create or update user profiles in Quantify as needed before users attempt to log in.
.png "image(84).png")
Adding External Users From Another Organization
You do not need to create guest accounts in your Azure tenant for users from an external organization. Quantify supports multiple domain configurations side by side.
To enable SSO for users from an outside organization:
Share this article with their IT team. They need to create their own App Registration following Steps 1 and 2 above, in their own Entra ID tenant.
Ask them to provide their Application (Client) ID and Directory (Tenant) ID once their App Registration is complete.
Add their domain in Quantify Global Options following Step 3, using the IDs they provided.
Create a Quantify user profile for each of their users, using their email address as the username.
When an external user logs in for the first time, their browser may prompt them to approve access to the Quantify application. This is standard Entra ID consent behavior and is handled on their side.
On sharing the Tenant ID and Client ID: These are identifiers, not credentials. They tell Quantify where to send the authentication request but do not grant access to anything inside the external organization's tenant. The Client Secret, which is sensitive, stays within their Azure portal and is never shared with you.
Troubleshooting
Symptom | Likely Cause | Action |
|---|---|---|
Password field still appears | The username entered is not an email address, or the domain is not configured in Global Options | Confirm the domain is added under Global Options and that the username is an email address |
This username does not exist or is not active | The email address is not registered as a username in Quantify | Create or update the user profile in Quantify |
Verify Keys fails | Incorrect Client ID or Tenant ID, or the App Registration is not yet active | Double-check the IDs copied from Azure and confirm the App Registration is complete |
Login fails with no error | Redirect URI mismatch | Confirm the URIs registered in Step 2 exactly match your server's URL, including subdirectory and casing |
SSO not working for some users | Those users have non-email usernames or domains not configured in Global Options | Update usernames to email format and/or add the missing domain in Global Options |