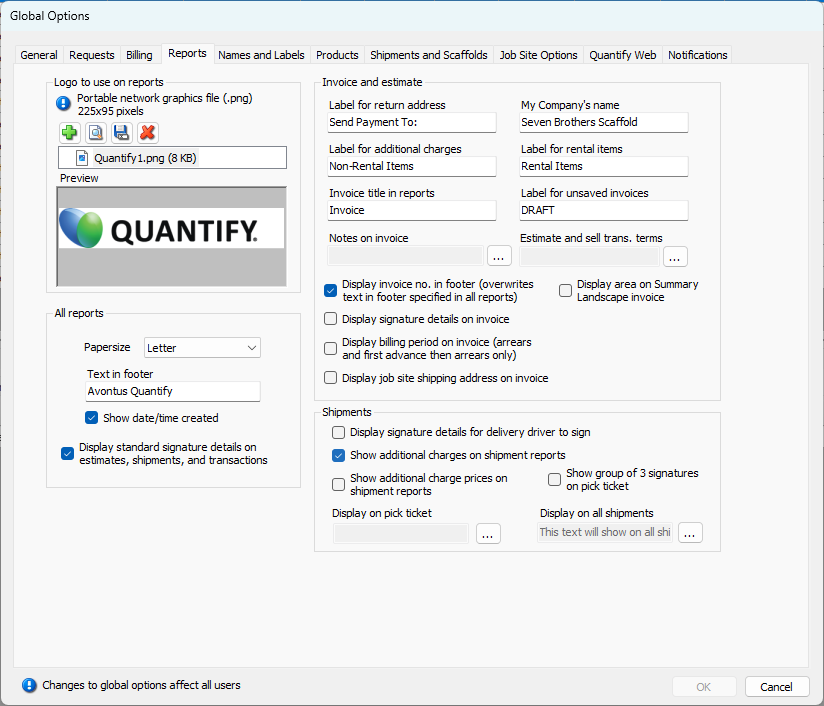
The Reports tab enables you to determine how your reports, estimates, invoices, etc. look and what kinds of information they contain, including::
- Adding a logo to your reports
- Configuring footer text, creation date/time, signature details, billing period, etc.
- Controlling the size and appearance of invoices, estimates, pick tickets and shipments
For more details, refer to the sections below.
Logo to Use on Reports Section
Use the information in this section to help you manage the images that appears in Quantify reports.
| Portable networks graphics file (.png) 225x95 pixels | This text shows what type of file a logo image must be (.png) and its dimensions (225x95 pixels). |
Add | Click this button to add an image to Quantify reports. |
View | Click this button to view the image that appears in Quantify reports. |
Save | Click this button to save the image that appears in Quantify reports onto your computer. |
Delete | Click this button to delete the image that appears in Quantify reports. |
| Name text field | This text field displays the name of the current logo file. |
| Preview | This area displays the current logo image, |
All Reports Section
The properties defined in this section determine some characteristics of the reports that Quantify produces.
| Papersize | Use this dropdown to determine what size Quantify reports appear and print in. |
| Text in footer | Use this text field to add copy that appears in the footers of Quantify Reports. |
| Show date/time created | When this checkbox is checked, Quantify adds report creation date and time to reports it generates. |
| Display standard signature details on estimates, shipments, and transactions. | When this checkbox is checked, Quantify adds Received By signature lines to Estimates, Shipments and Transactions.
|

Invoice & Estimate Section
Use the information in this section to help you determine which boilerplate text (if any) appears on printed invoices and estimates. You can also ensure that invoices for jobs using the Arrears and First Advance then Arrears billing methods contain the Job Site billing cycle.
| Label for return address | Use this text field to configure the label above the return address that you want to appear on invoices and estimates. For example: Send Payment To: . |
| Label for additional charges | Use this text field to configure the label above the Additional Charges section on invoices and estimates. For example: Non-Rental Items: . |
| Invoice title in reports | Use this text field to configure the name of invoices in Quantify Reports. For example: Invoice . |
| Notes on invoice | This text field displays any notes that appear on all invoices. |
Add Notes | Click this button to add notes that appear on all invoices. When you do, the Notes dialog appears, enabling you to enter and edit notes.
|
| My Company's name | Use this text field to configure the company name that you want to appear on invoices and estimates. |
| Label for rental items | Use this text field to configure the label above the Rental Items section on invoices and estimates. For example: Rental Items . |
| Label for unsaved invoices | Use this text field to configure the watermark for unsaved invoices. For example: DRAFT . |
| Estimate and sell trans. terms | This text field displays any terms that appear on all estimates and sell transactions. |
Add Terms | Click this button to add terms that appear on all estimates and sell transactions. When you do, the Notes dialog appears, enabling you to enter and edit terms.
|
| Display invoice no. in footer (overwrites text in footer specified in all reports) | When this checkbox is checked, Quantify displays the invoice number in the footer of each invoice. |
| Display signature details on invoice | When this checkbox is checked, Quantify adds signature lines to invoices.
|
| Display billing period on invoice (arrears and first advance then arrears only) | When this checkbox is checked, Quantify displays the billing period in each Arrears and First Advance then Arrears invoice. |
| Display job site shipping address on invoice | When this checkbox is checked, Quantify displays the job site shipping address in each invoice. |
| Display area on Summary Landscape invoice | When this checkbox is checked, Quantify adds two columns (Area and Total Area) to the Rental Items section of invoices. |

Shipments Section
Use the information in this section to help you determine whether some specific elements appear on shipment-related documents: Shipment Reports, Pick Tickets, etc.
| Display signature details for delivery driver to sign | When this checkbox is checked, Quantify displays a Delivered by signature line in Shipment reports and pick tickets (not pivot reports).
|
| Show additional charges on shipment reports | When this checkbox is checked, Quantify adds additional charges items to Shipment Reports. |
| Show additional charge prices on shipment reports | When this checkbox is checked, Quantify adds additional charges prices to Shipment Reports. |
| Show group of 3 signatures on pick tickets | By default, Quantify displays one signature line when it displays and prints a pick ticket.
When this checkbox is checked, Quantify displays that line plus three new signature lines : Prepared by, Delivered by and Received by.
|
| Display on pick tickets | This text field displays any notes that appear on all pick tickets. |
Add Pick Ticket Notes | Click this button to add notes that appear on all pick tickets. When you do, the Notes dialog appears, enabling you to enter and edit notes.
|
| Display on all shipments | This text field displays any terms that appear on all shipments. |
Add Shipment Notes | Click this button to add notes that appear on all shipments. When you do, the Notes dialog appears, enabling you to enter and edit notes.
|

