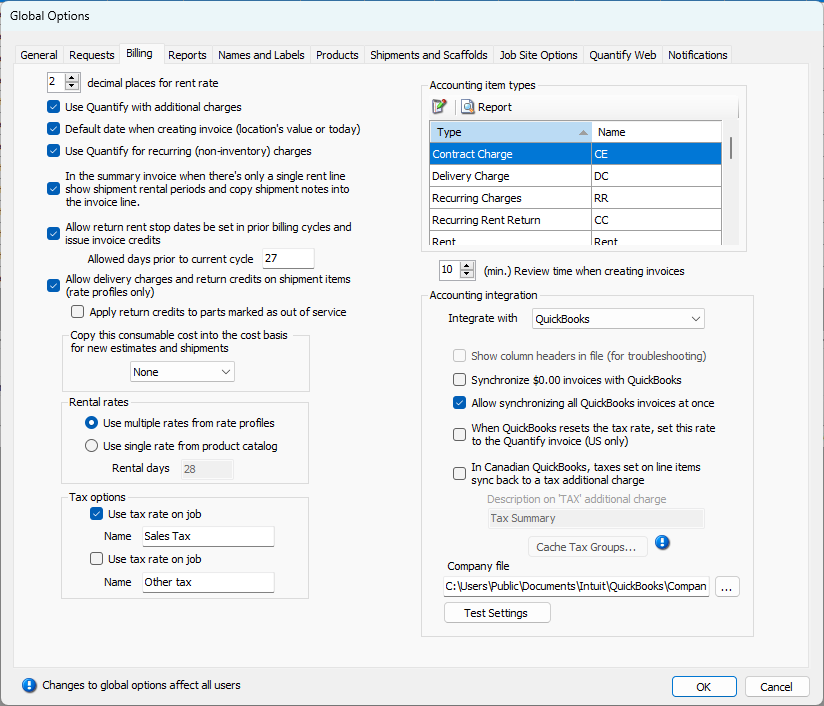
The Billing tab enables you to configure global billing options. You can enable/disable Additional and Recurring Charges, configure accounting item types, integrate with your accounting software, determine the source of rental rates, enable delivery charges and return credits on shipment items, etc.
Upper Left Section
The properties in the upper left section enable you to set specific features (like Recurring and Additional Charges) and important parameters.
Decimal places for rent rate | Use this text field to configure the number of decimal places Quantify will use when calculating the rental rates that appear in Rate Profiles. |
Use Quantify with additional charges | When this checkbox is checked, Quantify enables you to add Additional Charges to Estimates, Shipments and Service Tickets. To learn about additional charges, refer to Working with Additional Charges. |
Default date when creating invoice (location's value or today) | When this checkbox is checked, Quantify uses the date set in the Billing tab of the Job Site dialog as the default invoice date when creating new invoices. |
Use Quantify for recurring (non-inventory) charges | When this checkbox is checked, Quantify enables you to add Recurring Charges to Estimates and Shipments. To learn about recurring charges, refer to Working with Recurring Charges. |
In the summary invoice when there's only a single rent line, show shipment rental periods and copy shipment notes into the invoice line. | When this checkbox is checked, Quantify includes shipment rental periods in the Scaffold Summary Invoice. It also adds shipment notes into the invoice line. |
Allow return rent stop dates be set in prior billing cycles and issue invoice credits | When this checkbox is checked, Quantify allows users to stop rent on equipment before the end of the current billing cycle and calculate credit for the interval between the stop rent date and date of the end of the billing cycle. |
Allowed days prior to current cycle | Use this text field to configure the number of days before the end of the current billing cycle Quantify will allow the return stop rent to apply. |
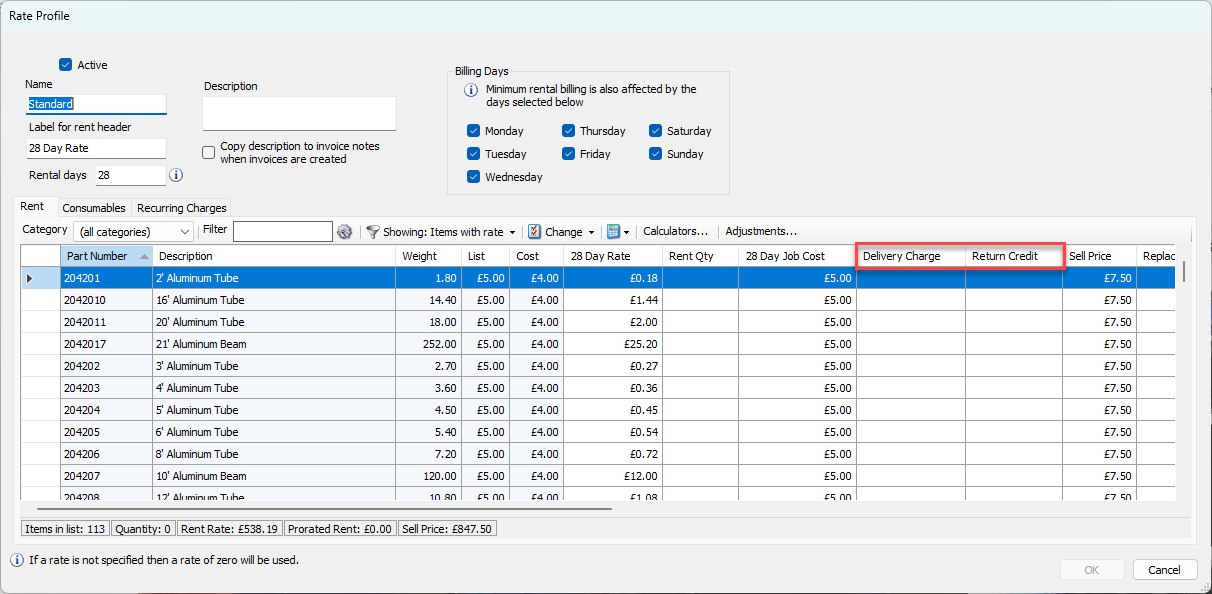
Allow delivery charges and return credits on shipment items (rate profiles only) | When this checkbox is checked, Quantify displays the Delivery Charges and Return Credits columns in the Rate Profile Dialog.
|
Apply return credits to parts marked as out of service | When this checkbox is checked, Quantify applies return credits to parts that users place out of service. To learn more about Out of Service Items, refer to Working with Out of Service Items. |
Copy this consumable cost into the cost basis for new estimates and shipments | Use this dropdown to determine whether Quantify copies specific consumable costs into the cost basis for new Estimates and Shipments. These costs include catalog cost, last cost and average cost. |
Rental Rates Section
Use the radio buttons and text field in this section to determine where Quantify gets rental rates.
Use multiple rates from rate profiles | When this radio button is selected, Quantify provides multiple rentals rates (sourced from Rate Profiles) in the Rate Profile dropdown in the Rent sub-tab of the Billing tab in the Job Site dialog. |
Use single rate form product catalog | When this radio button is selected, Quantify provides a single rental rate for Job Sites. |
Rental days | This text field becomes active when you select the Use single rate form product catalog radio button, above. Use it to determine the number of days in each rental period. |
Tax Options Section
Use the text fields in this section to set tax rate option names.
Use tax rate on job | When either or both of these checkbox(es) is checked, Quantify displays Tax Rate dropdowns in the Options sub-tab of the Billing tab in the Job Site dialog. |
Name | Use this text field to determine the names of the Tax Rate dropdowns enabled above. |
The Accounting Item Types Section
Use the Accounting Item Types section to manage and report on the accounting item types used with Quickbooks integration.
Edit | Select the appropriate Accounting Item Type and click this button to edit the item. |
Report | Click this button to view a report on Accounting Item Types. The report includes:
|
Type | This column displays the current accounting item types: contract charge, delivery charge, rent, etc. |
Name | This column displays the Quantify names for the current accounting item types: CE, DC, rent, etc. |
Review time when creating invoices | Use this text field to determine the amount of time during which no other user can create Invoices for a Job Site while a user creates an Invoice for the same Job Site. This setting helps prevent multiple users creating invoices for the same Job Site at the same time. |

Item Type Dialog
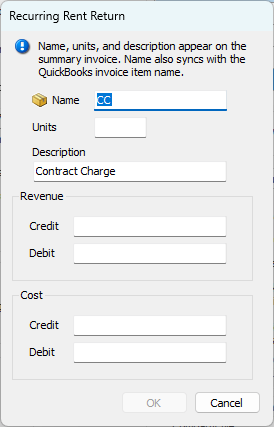
Use the Item Type dialog to edit the Accounting Item Types used with Quickbooks integration.
Name | Use this text field to configure the Quantify name for the Accounting Item Type. |
Units | Use this text field to configure the type of unit that applies to the item. For example: each, linear foot, etc. |
Description | Use this text field to provide a description of the item. |
Revenue Credit | Use this field to provide the Revenue Credit |
Revenue Debit | Use this field to provide the Revenue Debit |
Cost Credit | Use this field to provide the Cost Credit |
Cost Debit | Use this field to provide the Cosr Debit |
Accounting Integration Section
Use the features in this section to integrate Quantify with specific accounting software and configure that integration.
Integrate with | Use this dropdown to configure which (if any) accounting applications Quantify will integrate with. Your options are:
|
Show column headers in file (for troubleshooting) | This is specific to the Oracle export. By default the exported file does not have column headers. This makes it harder to troubleshoot if there are any problem with the file or the data. When this checkbox is checked, Quantify will export a version of the file that includes headers.
|
Allow synchronizing all QuickBooks invoices at once | When this checkbox is checked, Quantify will sync every single Invoice ever created in Quantify with QuickBooks. Even Invoices previously synced will go through the process again to make sure the status matches. This is a very time consuming process.
|
When QuickBooks resets the tax rate, set this rate to the Quantify invoice (US only) | Sometimes QuickBooks has a different tax rate than Quantify, When this checkbox is checked and an invoice is generated, Quantify will use the tax rate in QuickBooks for the invoice.
|
In Canadian QuickBooks, taxes set on line items sync back to tax additional charge | When this checkbox is checked, Quantify will list taxes entered as Additional Charges and not as taxes. This is unique to the Canadian version of QuickBooks. Taxes are not charged in Quantify at first and only appear once the Invoice is synced with Quickbooks. At the time of syncing, the taxes are brought from Quickbooks into Quantify, but are shown as additional charges rather than traditional taxes.
|
Description on "TAX" additional charge | Use this text field to configure the label for the taxes that appear as additional charges, resulting from the above sync with Canadian QuickBooks. Note: This text field is only active when Quickbooks has been selected from the Integrate with dropdown and the In Canadian Quickbooks, taxes are set on the items sync back to a tax additional charge checkbox is checked. |
Cache Tax Groups | Click this button to cache the names of tax groups in Quickbooks, for increased performance when syncing with Canadian Quickbooks.
|
Company File | This text field displays the path to the Quickbooks Company File. If you want to change the location, click the Find File button ( Note: This text field becomes active when you select QuickBooks from the Integrate with dropdown. |
Test Settings | Click this button to test your Quantify/QuickBooks integration.
|