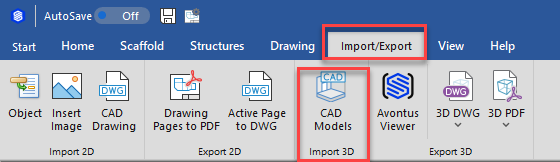
You can import CAD Models into Avontus Designer by selecting CAD Models in the Import/Export tab
This will launch the CAD Model Import dialog.

Note that when you launch the CAD Model Import for the first time, it will be empty (see above). Otherwise, it will display the last model you imported (see below).
.png "image(4).png")
Then click Import Model, and select a file. The supported file types are:
AutoCAD drawing (*.dwg, *.dxf)
IFC (BIM format) (*.ifc, *.ifczip)
STEP format (*.stp, *,step)
Obj format (*.obj)
STL format (*.stl)
Control | Purpose |
|---|---|
Import Model | Import a CAD model. It is possible to import more than one CAD model. |
Delete Model | Delete the imported model |
Move model | Move the model on the X, Y and Z axis by a specified number of meters. |
Rotate Model | Rorate the model on the X, Y and Z axis by a specified number of degrees. |
Scale Model | Select the scale factor for the model |
Dynamic Transformation | Allows users to move and rotate a 3D object. |
Remove Selected | Select to remove the selected part. The selected part is highlighted yellow |
Selection Mode | Change the selection mode of the parts of the 3D model. This could be a single click or enclosed in a box |
Select All | Select all parts of the model |
Select Invert | Selected all unselected parts and deselected all selected parts |
Select None | Unselect all selected parts |
Conceptual View | Select to display this model in the conceptual view |
Model 3D view | Select to display this model in the 3D model view. |
Perspective | Select to view the model in the perspective view |
Orthogonal | Select to view the model in the orthogonal view |
Copy as Raster | Copy the model as a Raster image and paste it to your drawing. |
Copy as Vector | Copy the model as a vector image and paste it to your drawing. |
Export 2D DWG File | Export as 2d DWG file |
Raster | Select this option to apply a raster drawing of the model onto the drawing page |
Vector | Select this option to apply a vector drawing of the model onto the drawing page |
None | Select this option to apply either a raster or a vector drawing. |
Apply | Apply any changes made to the model |
OK | Apply any changes made to the model and close the dialog |
Cancel | Cancel any changes and close the model. |
CAD Model controls
In the Model area are a number of controls that change the view of the model
| Return to the default view of the model |
| Use this icon to zoom into the magnified area |
| Click and drag to zoom into the selected area |
| Click this icon and use the mouse roller to zoom in and out |
| Use this icon to pan across the model area. |
| Click the drag to rotate the model |
| Select this icon to zoom to the perfect point where the entire model is displayed on the screen |
| Change the direction and vantage point in which you view the model |