The People screen provides an overview of all users in the system and their assigned roles. This screen is vital in the managing of all users in the system, setting their permissions, and making changes to their accounts.
You can access the People screen from any of the main screens.
The Admin user will add the first users in the system in the People screen.

On the toolbar, you will find the following options.
Add
Click this button to add a new person.
![]()
For more information on adding a new user, please visit the Adding a Person guide.
Edit
Click this button to edit a person.
![]()
For more information on adding a new person, please visit the Editing a Person guide.
Delete
Click this button to delete the person.
![]()
Note: People cannot be deleted if they have ever been assigned to a request or scaffold in any capacity.
For more information on adding a new user, please visit the Deleting a Person guide.
Refresh
Reload the data within the table.
![]()
Roles
Click this button to create, edit or delete roles. People can be added to roles, which will determine what they can do in the system. These roles are split into Subscriber and Viewer. Roles need to be created before you add new users. You must also create Viewer User Roles before you can create View-only users.
See Roles & Permissions for more information.
![]()
Resend Confirmation Email
Click this to resend a confirmation email to the selected user.
![]()
Reset Password
Click this to reset the password for the selected user.
![]()
The Person table contains the following columns.
Column | Purpose |
Name | The name of the person who owns the account |
The email address of the person's account | |
Contractor | The contracting company the person is employed by |
Status | Indicates the status of the person's account (e.g. Confirming Email). |
Active | Indicates whether this person is an active user. |
Last Login | Indicates when the person last logged in to this account. |
| Administrator | Indicates that this person is the administrator |
On each column is a small key-like icon that allows you to filter results on that column.

For more information on using filters, please visit the Working with Filters guide.
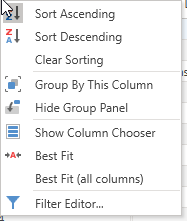
Left-click on the column to switch between ascending and descending order of that column. Right-click on the column to reveal more options, including:
Group by column
Hide/show group column
Show column Chooser
Best Fit
Best Fit (all columns)
Filter Editor.
Note: More information on these options is explained in the Grouping section.